Sunday, November 25, 2007

Daddy's Fingerless Gloves


My fathers birthday always sneaks up quickly after Thanksgiving. Yesterday morning I found myself without a gift for him. I really wanted to make him something that I thought he would be able to use but, I wasn’t sure what exactly that was. So… While shopping at JoAnne’s during their crazy after Thanksgiving sale, I came upon some chunky weight wool blend yarn in a perfect shade of green. I knew instantly that I wanted to make him some fingerless gloves that he can wear under his leather work gloves when he’s working out in his garage in the cold. When I got home I realized that I didn’t have a pattern for fingerless gloves that called for chunky yarn. So, I set about making a pattern for myself.

Below you’ll find the pattern that I used. Please note however that this is my first ever pattern. I wasn’t sure how to word some things, so please let me know if you find any obvious mistakes.

I knit these in the round like I do for socks. Starting at the cuff and working up the wrist. You can make the cuff on these as long or short as you want. These knit up really quickly. I had two pairs done in about 5 hours of knitting. That included me ripping some parts out and adjusting things where needed. Also, these gloves are unisex. This pattern is for personal use only.

Daddy's Fingerless Gloves Pattern

Yarn I used: Lion Brand Wool – Ease Chunky Yarn
80% Acrylic 20% Wool
I made two pairs of gloves with this yarn. And, I still have enough left for another pair.

Needles: Size 8 dpns set of 4
Cuff-

CO 20 sts. Divide stitches as follows on your needles. Needle one 7 sts. Needle two 6 sts. Needle three 7 sts.

(This made a snug fit on my husbands and my hands. So If you have larger wrists you may want to cast on 4 more stitches)

Ribbing: K2 P2 all stitches until cuff reaches desired length

Hand Part-

Needle One- K3 M1 K4

Needle Two – K2 M1 K2 M1 K2

Needlt Three – K3 M1 K4

You should now have 8 stitches on each needle

Knit all sts around for approx. 1”

Then Cont. as follows:

*Round 1: Needle One – K7 M1 K1

Needle Two – K1 M1 K7

Needle Three – K all sts

Round 2: Knit all stitches around*

*Continue these two rounds 3 more times.

Knit 3 more rows even


Thumb Opening -


Row 1 - Needle One – K6 BO5

Needle Two – BO5 K6

Needle Three – K all sts

The next part I’m not quite sure how to wrist… I hope it’s not to confusing.

Using Needle Three knit to last two stitches on Needle One. Using a new needle knit the two stitches on needle one and CO4 sts. Using same needle knit two stitches from needle two. Now using a new needle knit all stitches from needle two and pick up a few from needle three. So that you have all the sts from the thumb area on one needle and the other evenly divided. Now you just knit till desired finger length. Mine is about 1.5” tall. I wanted my dad to be able to wear regular gloves over them.

Finishing –

Loosely CO all stitches and weave in ends.

That’s it!! You’ve now got a pair of warm and comfy fingerless gloves.

Sunday, November 4, 2007

First Kool Aid Dying Experience!!


So, early last week I received over 8 lbs of wool roving's from the Sheep Shed. (I'll post about that later) I decided to dye up some of the roving's using Kool Aid. I only had a few colors in the house, so I grabbed two 3 oz. sections of roving's and made two batches using the following colors: First I used Cherry, Black Cherry, and Grape. I was hoping for more of a blended look. You can barely see the difference between Cherry and Black Cherry. But, I still love it and I can't wait to spin it up this week. For the other batch I used, Strawberry, Lemon Lime, and Raspberry Reaction. I love how this one turned out. I really have to get more colors the next time I'm at the supermarket. I've never dyed anything before, so I was kinda shooting in the dark. I used bits and pieces of other tutorials to make these. Here's a sum up of how I did it.

First I got small plastic cups for mixing my colors in. I them covered the counter with a double layer of saran wrap.

I dampened my wool a bit and layed it on the saran wrap.

Then I used a spoon to put the colors where I wanted them.

After I was done with that, I wrapped the wool in the saran wrap and rolled it up and put it into a Tupperware bowl. I did both batches the same way.

When both were done I put both Tupperware in the microwave and microwaved them for one minute.... then turned over the wool so the dye would evenly fall to the other side and nuked for another minute. I had no idea how long it needed to absorb all the dye, so I ended up nuking the stuff for like 10 min. (probably to long) I noticed that the water was clear and all the dye had been absorbed by the wool.

I rinsed it out in the sink and let it dry. And... Ta Da!!!! Pretty roving's!!!

After it was done drying I broke up the roving's into pencil rovings so I have an easier time of spinning it. I'm still not good at doing it with big wads. In all it was lots of fun. I'm going to let my daughters help next time. They will LOVE it.

Tuesday, October 16, 2007

What's On My End Table (In The Knitting Basket)


Thought I'd show what I'm currently working on. I haven't been spinning this week, but I have been knitting like crazy. I'm almost done with my little ones other sock. And I started on a pair of socks for a Christmas gift. I'm using Berocco Alpaca and I'm loving it. The color is so pretty and it's knitting up so wonderfully. I'm hoping to finish the first sock tonight and get the next cast on. As you can see, I don't have an official knitting basket. I just use the drawer in our end table next to the sofa. The top also conveniently doubles as a work surface for my work. Oh!! And, I'm recycling my first sweater. It's in the back of the end table. I've got it about 1/4 the way unraveled. It's taking a long time, but it'll be worth it in the end. I think I might use some it to ply some of my hand spun singles that I have.

Wednesday, October 10, 2007

Socks, Socks, And More Socks!!


I absolutely love to knit socks. I've made 4 pairs so far and I have another on the needles. These were knit up with Cascade Fixation Yarn. It's a dream to knit because of all the stretch it has and I love the colors that it's available in.

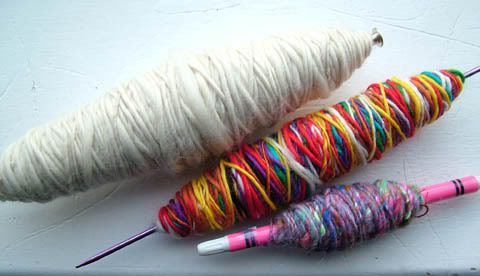
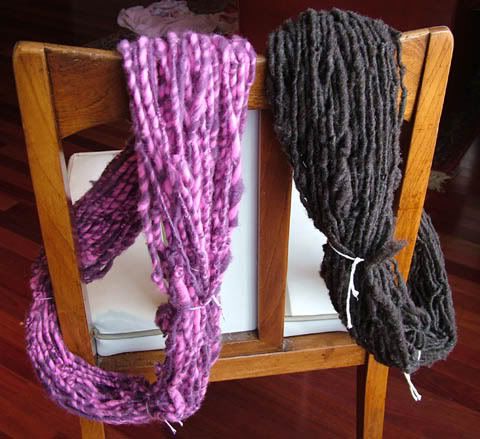
Yarns Created By My Spinner


So.. Since my spinner has been completed I've been spinning on it almost non-stop during my "free" time. I'm planning to plie (if that's the right word?) all but the multi color sparkly one on the pink pencil. I'm still not sure what I'm going to do with the chunky pink/purple one or the brown one. There might be enough of the brown one for a hat. The one with all the primary colors is going to be plied together with another one just like it. For a "scrap" yarn look. I'm really hoping there is enough for some fingerless gloves. The cream colored one is going to be dyed after I finish doing 2 more just like it. I'm planning to plie two of them together to make some socks. Fun, Fun, Fun!!!

My First Spindle Spinner!!!


First Post: My Spinner!!

So... I've been knitting for a long time. (on and off) And I recently fell in love with knitting socks. While searching for sock patterns and information I stumbled upon this whole world of spinners!! After doing more research I decided that I had to spin my own yarns too. I made a makeshift drop spindle and gave it a whirl. Needless to say... it wasn't going fast enough. (I need instant gratification) Not to mention the fact that I couldn't seem to get myself coordinated enough to make it really work right. My hubby watched me struggle and decided that he could make me a spindle spinning wheel using a dremel as power. It took him almost 2 weeks and lots of "thinking" to come up with a plan that would work right. It still needs a bit of tweeking here and there, but all together it spins perfectly!! I've spun 5 skeins on it so far and I plan to do a lot more. Here's a pic of my finished spinner with my first attempt at using it.

Monday, October 1, 2007

Who Am I?


In a nutshell... I'm a mother, wife, daughter, sister, friend, and major fiber addict.  Yes, I do confess.  I have more fabric, yarn, embroidery thread, trims, patterns, and spinning fibers than any one women should.  But, I can't help it.  I love it all.  Sometimes I want to sit and spin.  And, others I want to cut out quilt squares or sew a new outfit for one of the kids or dolls.  Feeling those yarns pull through my fingers as I knit, crochet, or spin just gives me such a sense of peace.  It's such a tangible thing that I'm doing.  Whatever I'm doing.  Even if it's just the simple pleasure of cuddling with one of the kids under a blanket that I've made.
And my blog?  Well, here is my place to document some of it.  The good, the bad, and sometimes the ugly.  Yep, I said ugly. Hopefully you'll find something here that will make you laugh, oooohhh and awwww, or maybe just be inspired to try something new.  I share tutorials, recipes, reviews, and give the occasional advise.  So, grab a cup of something yummy and browse around.  


That's me.  Sitting and working.  This is an older photo...maybe from 2009.  I really need to find a new one of me at working.
 Fabrics, and buttons, and fibers, and cubbies... oh my!
 My Mrs. Weasley wrap.  I spun the yarn myself.  It's my favorite wrap.

My end table on any given day.  Right now it's got a toy car, a water bottle, an empty Annie's crackers packet and my knitting bag.